10. シェーダ入門
10.1 カスタム 2D シェーダ
2D グラフィックス(図形やテクスチャ)が画面に描かれるとき、どのような頂点座標変換を行い、どのような色を出力するかは、「頂点シェーダ」と「ピクセルシェ―ダ」と呼ばれる、GPU 上で実行される 2 つのプログラムを通して計算・決定されます。
通常は Siv3D が用意しているシェーダプログラムが使用されますが、カスタムシェーダ機能を使うと、そのプログラムを変更し、GPU の計算性能を活用したユニークな描画プログラムを独自に実装できます。
Siv3D v0.6.15 で使えるシェーダプログラミング言語は次の 3 つです。ターゲットとするプラットフォームに応じた言語を使用します。
- HLSL シェーダーモデル 4.0
- GLSL 4.1
- GLSL ES 3.0
| ターゲット | HLSL | GLSL | GLSL ES |
|---|---|---|---|
| Windows | ✔ | ✔ (エンジンオプションを変更) |
|
| macOS | ✔ | ||
| Linux | ✔ | ✔ (エンジンオプションを変更) |
|
| Web | ✔ |
通常、Windows (Direct3D) では HLSL, macOS/Linux (OpenGL) では GLSL でシェーダを記述します。
Windows では SIV3D_SET(EngineOption::Renderer::OpenGL); を #include <Siv3D.hpp> の直後に記述することで OpenGL モードになり、その場合は GLSL を標準で使うようになります。
# include <Siv3D.hpp>
// Windows で Direct3D の代わりに OpenGL を使用するモードに切り替える
SIV3D_SET(EngineOption::Renderer::OpenGL);

void Main()
{
	// OpenGL による描画処理が行われる
}
10.2 デフォルトのシェーダ
カスタムのシェーダプログラムを書く前に、デフォルトで使われている図形およびテクスチャ描画のシェーダプログラムを見てみましょう。デフォルトで使われているものと同じシェーダが、プロジェクトの example フォルダに最初から用意されています。
Windows の場合: HLSL
2D 描画用の頂点シェーダ、図形用ピクセルシェーダ、テクスチャ用ピクセルシェーダ
//
//	Textures
//
Texture2D g_texture0 : register(t0);
SamplerState g_sampler0 : register(s0);

namespace s3d
{
	//
	//	VS Input
	//
	struct VSInput
	{
		float2 position : POSITION;
		float2 uv : TEXCOORD0;
		float4 color : COLOR0;
	};

	//
	//	VS Output / PS Input
	//
	struct PSInput
	{
		float4 position : SV_POSITION;
		float4 color : COLOR0;
		float2 uv : TEXCOORD0;
	};

	//
	//	Siv3D Functions
	//
	float4 Transform2D(float2 pos, float2x4 t)
	{
		return float4((t._13_14 + (pos.x * t._11_12) + (pos.y * t._21_22)), t._23_24);
	}
}

//
//	Constant Buffer
//
cbuffer VSConstants2D : register(b0)
{
	row_major float2x4 g_transform;
	float4 g_colorMul;
}

cbuffer PSConstants2D : register(b0)
{
	float4 g_colorAdd;
	float4 g_sdfParam;
	float4 g_sdfOutlineColor;
	float4 g_sdfShadowColor;
	float4 g_internal;
}

//
//	Functions
//
s3d::PSInput VS(s3d::VSInput input)
{
	s3d::PSInput result;
	result.position = s3d::Transform2D(input.position, g_transform);
	result.color = input.color * g_colorMul;
	result.uv = input.uv;
	return result;
}

float4 PS_Shape(s3d::PSInput input) : SV_TARGET
{
	return (input.color + g_colorAdd);
}

float4 PS_Texture(s3d::PSInput input) : SV_TARGET
{
	const float4 texColor = g_texture0.Sample(g_sampler0, input.uv);

	return ((texColor * input.color) + g_colorAdd);
}
HLSL では、1 つのファイルに複数のシェーダ関数をまとめて記述できます。
HLSL ファイル default2d.hlsl の VS() が、デフォルトの頂点シェーダ関数です。入力 s3d::VSInput を受け取り、定数バッファ VSConstants2D の座標変換情報と乗算カラーを適用した結果を s3d::PSInput 型で返します。
PS_Shape() が、デフォルトの図形描画用ピクセルシェーダ関数です。入力 s3d::PSInput を受け取り、出力するピクセルの RGBA カラー (float4 型) を求めます。
PS_Texture() が、デフォルトのテクスチャ描画用ピクセルシェーダ関数です。テクスチャ g_texture0 と、サンプラー g_sampler0 を使ってテクスチャから色を読み込みます。UV 座標として、頂点シェーダから渡される input.uv を使います。
macOS の場合: GLSL
2D 描画用の頂点シェーダ
# version 410

//
//	VSInput
//
layout(location = 0) in vec2 VertexPosition;
layout(location = 1) in vec2 VertexUV;
layout(location = 2) in vec4 VertexColor;

//
//	VSOutput
//
layout(location = 0) out vec4 Color;
layout(location = 1) out vec2 UV;
out gl_PerVertex
{
	vec4 gl_Position;
};

//
//	Siv3D Functions
//
vec4 s3d_Transform2D(const vec2 pos, const vec4 t[2])
{
	return vec4(t[0].zw + (pos.x * t[0].xy) + (pos.y * t[1].xy), t[1].zw);
}

//
//	Constant Buffer
//
layout(std140) uniform VSConstants2D
{
	vec4 g_transform[2];
	vec4 g_colorMul;
};

//
//	Functions
//
void main()
{
	gl_Position = s3d_Transform2D(VertexPosition, g_transform);

	Color = (VertexColor * g_colorMul);

	UV = VertexUV;
}
2D 図形描画用のピクセルシェーダ
# version 410

//
//	PSInput
//
layout(location = 0) in vec4 Color;

//
//	PSOutput
//
layout(location = 0) out vec4 FragColor;

//
//	Constant Buffer
//
layout(std140) uniform PSConstants2D
{
	vec4 g_colorAdd;
	vec4 g_sdfParam;
	vec4 g_sdfOutlineColor;
	vec4 g_sdfShadowColor;
	vec4 g_internal;
};

//
//	Functions
//
void main()
{
	FragColor = (Color + g_colorAdd);
}
2D テクスチャ描画用のピクセルシェーダ
# version 410

//
//	Textures
//
uniform sampler2D Texture0;

//
//	PSInput
//
layout(location = 0) in vec4 Color;
layout(location = 1) in vec2 UV;

//
//	PSOutput
//
layout(location = 0) out vec4 FragColor;

//
//	Constant Buffer
//
layout(std140) uniform PSConstants2D
{
	vec4 g_colorAdd;
	vec4 g_sdfParam;
	vec4 g_sdfOutlineColor;
	vec4 g_sdfShadowColor;
	vec4 g_internal;
};

//
//	Functions
//
void main()
{
	vec4 texColor = texture(Texture0, UV);

	FragColor = ((texColor * Color) + g_colorAdd);
}
GLSL では、1 つのファイルに 1 つのシェーダ関数を実装します。
頂点シェーダファイル default2d.vert の main() が、デフォルトの頂点シェーダ関数です。VSInput の形式で入力座標を受け取り、定数バッファ VSConstants2D の座標変換情報と乗算カラーを適用した結果を VSOutput の形式で出力します。
ピクセルシェーダファイル default2d_shape.frag の main() が、デフォルトの図形描画用ピクセルシェーダ関数です。PSInput 形式で入力を受け取り、出力するピクセルの RGBA カラー (vec4 型) を FragColor に書き込みます。
ピクセルシェーダファイル default2d_texture.frag の main() が、デフォルトのテクスチャ描画用ピクセルシェーダ関数です。テクスチャサンプラー Texture0 から色を読み込みます。UV 座標として、頂点シェーダから渡される UV を使います。
10.3 カスタムシェーダを読み込む
頂点シェーダは VertexShader クラス、ピクセルシェーダは PixelShader クラスで扱います。
プラットフォームに応じて自動的に適切なシェーダを読み込むために、HLSL{} と GLSL{} と演算子 | を使った記述方法が用意されています。
// Direct3D 環境では HLSL ファイルから
// OpenGL 環境では GLSL ファイルからピクセルシェーダを作成する
const PixelShader ps = HLSL{ ... } | GLSL{ ... };
実行するプラットフォームが固定(例えば Windows のみ)の場合は、次のように記述しても問題ありません。
HLSL{} には、ファイルパスとエントリーポイントの名前を渡します。
GLSL{} には、ファイルパスと「定数バッファ(定義済み定数バッファを含む)の名前とスロットインデックスの組」の配列を記述します。
デフォルトのシェーダ 3 つを読み込むプログラムは次のようになります。
# include <Siv3D.hpp>

void Main()
{
	// 2D 描画用のデフォルトの頂点シェーダ
	const VertexShader vs2D = HLSL{ U"example/shader/hlsl/default2d.hlsl", U"VS" }
		| GLSL{ U"example/shader/glsl/default2d.vert", {{U"VSConstants2D", 0}} };

	// 2D 図形描画用のデフォルトのピクセルシェーダ
	const PixelShader ps2DShape = HLSL{ U"example/shader/hlsl/default2d.hlsl", U"PS_Shape" }
		| GLSL{ U"example/shader/glsl/default2d_shape.frag", {{U"PSConstants2D", 0}} };

	// 2D テクスチャ描画用のデフォルトのピクセルシェーダ
	const PixelShader ps2DTexture = HLSL{ U"example/shader/hlsl/default2d.hlsl", U"PS_Texture" }
		| GLSL{ U"example/shader/glsl/default2d_texture.frag", {{U"PSConstants2D", 0}} };

	if ((not vs2D) || (not ps2DShape) || (not ps2DTexture))
	{
		throw Error{ U"Failed to load shader files" };
	}

	while (System::Update())
	{

	}
}
10.4 カスタムシェーダを適用する
シェーダを読み込んだだけでは、まだそのシェーダは使われません。
ScopedCustomShader2D オブジェクトのコンストラクタに頂点シェーダやピクセルシェーダを渡すと、そのオブジェクトのスコープが有効な間、2D 描画がそのカスタムシェーダを使用して描画されるようになります。
次のコードは、カスタムシェーダを描画に適用する例です。シェーダプログラムの内容はデフォルトのシェーダと同じであるため、見た目は通常の描画と同じ結果になります。
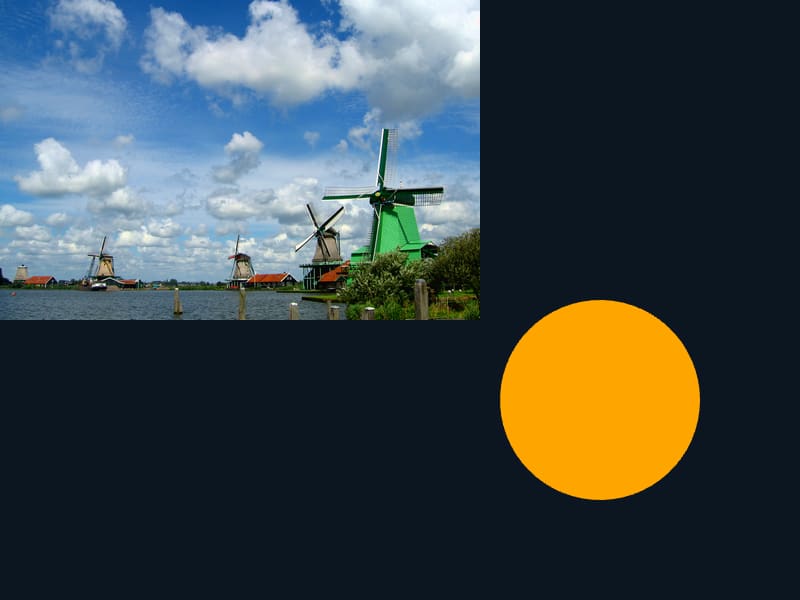
# include <Siv3D.hpp>

void Main()
{
	// 2D 描画用のデフォルトの頂点シェーダ
	const VertexShader vs2D = HLSL{ U"example/shader/hlsl/default2d.hlsl", U"VS" }
		| GLSL{ U"example/shader/glsl/default2d.vert", {{U"VSConstants2D", 0}} };

	// 2D 図形描画用のデフォルトのピクセルシェーダ
	const PixelShader ps2DShape = HLSL{ U"example/shader/hlsl/default2d.hlsl", U"PS_Shape" }
		| GLSL{ U"example/shader/glsl/default2d_shape.frag", {{U"PSConstants2D", 0}} };

	// 2D テクスチャ描画用のデフォルトのピクセルシェーダ
	const PixelShader ps2DTexture = HLSL{ U"example/shader/hlsl/default2d.hlsl", U"PS_Texture" }
		| GLSL{ U"example/shader/glsl/default2d_texture.frag", {{U"PSConstants2D", 0}} };

	if ((not vs2D) || (not ps2DShape) || (not ps2DTexture))
	{
		return;
	}

	const Texture texture{ U"example/windmill.png" };

	while (System::Update())
	{
		{
			// 2D 図形描画用の頂点シェーダ、ピクセルシェーダを適用
			const ScopedCustomShader2D shader{ vs2D, ps2DShape };
			Circle{ 600, 400, 100 }.draw(Palette::Orange);
		} // ここで適用が解除される

		{
			// 2D テクスチャ描画用の頂点シェーダ、ピクセルシェーダを適用
			const ScopedCustomShader2D shader{ vs2D, ps2DTexture };
			texture.draw();
		} // ここで適用が解除される
	}
}
10.5 テクスチャの R 成分と B 成分を入れ替えるシェーダ
標準のシェーダを改造するサンプルとして、テクスチャの R 成分と B 成分を入れ替えて描画するカスタムピクセルシェーダを使ってみます。このカスタムシェーダはプロジェクトの example フォルダに最初から用意されています。
頂点シェーダについては、標準のものから変更しません。ScopedCustomShader2D にはピクセルシェーダのみを渡します。

HLSL
//
//	Textures
//
Texture2D		g_texture0 : register(t0);
SamplerState	g_sampler0 : register(s0);

namespace s3d
{
	//
	//	VS Output / PS Input
	//
	struct PSInput
	{
		float4 position	: SV_POSITION;
		float4 color	: COLOR0;
		float2 uv		: TEXCOORD0;
	};
}

//
//	Constant Buffer
//
cbuffer PSConstants2D : register(b0)
{
	float4 g_colorAdd;
	float4 g_sdfParam;
	float4 g_sdfOutlineColor;
	float4 g_sdfShadowColor;
	float4 g_internal;
}

float4 PS(s3d::PSInput input) : SV_TARGET
{
	float4 texColor = g_texture0.Sample(g_sampler0, input.uv);

	texColor = texColor.bgra;

	return (texColor * input.color) + g_colorAdd;
}
GLSL
# version 410

//
//	Textures
//
uniform sampler2D Texture0;

//
//	PSInput
//
layout(location = 0) in vec4 Color;
layout(location = 1) in vec2 UV;

//
//	PSOutput
//
layout(location = 0) out vec4 FragColor;

//
//	Constant Buffer
//
layout(std140) uniform PSConstants2D
{
	vec4 g_colorAdd;
	vec4 g_sdfParam;
	vec4 g_sdfOutlineColor;
	vec4 g_sdfShadowColor;
	vec4 g_internal;
};

//
//	Functions
//
void main()
{
	vec4 texColor = texture(Texture0, UV);

	texColor = texColor.bgra;

	FragColor = (texColor * Color) + g_colorAdd;
}
HLSL, GLSL ともに、テクスチャから色 texColor を読み取ったあと、texColor = texColor.bgra; によって RGBA の並びを BGRA に変更することで、R 成分と B 成分を入れ替えます。
# include <Siv3D.hpp>

void Main()
{
	const Texture windmill{ U"example/windmill.png" };
	const PixelShader ps = HLSL{ U"example/shader/hlsl/rgb_to_bgr.hlsl", U"PS" }
		| GLSL{ U"example/shader/glsl/rgb_to_bgr.frag", {{U"PSConstants2D", 0}} };

	if (not ps)
	{
		throw Error{ U"Failed to load a shader file" };
	}

	while (System::Update())
	{
		{
			// R と B を入れ替えるピクセルシェーダを適用
			const ScopedCustomShader2D shader{ ps };
			windmill.draw(10, 10);
		} // ここで適用が解除される
	}
}
10.6 定数バッファの使用
シェーダプログラム内で使う定数群「定数バッファ」を C++ プログラムから設定できます。
デフォルトの 2D シェーダは、次の予約済みの定数バッファを持っています。
- 頂点シェーダ
VSConstants2D(slot 0)
- ピクセルシェーダ
PSConstants2D(slot 0)
予約済み定数バッファには、Siv3D での 2D 描画に最低限必要な情報が格納されます。
カスタムシェーダで独自の定数バッファを使いたい場合、予約されている 0 番以外のスロットインデックスを使います。
R 成分と B 成分の入れ替えに使ったシェーダファイル example/shader/hlsl/rgb_to_bgr.hlsl または example/shader/glsl/rgb_to_bgr.frag を同じフォルダ内でコピーし、それぞれ threshold.hlsl, threshold.frag という名前に変更しましょう。
そして、画像の内容を、閾値を基準として黒と白の二値に塗りわけるシェーダプログラムに書き換えます。

HLSL
//
//	Textures
//
Texture2D		g_texture0 : register(t0);
SamplerState	g_sampler0 : register(s0);

namespace s3d
{
	//
	//	VS Output / PS Input
	//
	struct PSInput
	{
		float4 position	: SV_POSITION;
		float4 color	: COLOR0;
		float2 uv		: TEXCOORD0;
	};
}

//
//	Constant Buffer
//
cbuffer PSConstants2D : register(b0)
{
	float4 g_colorAdd;
	float4 g_sdfParam;
	float4 g_sdfOutlineColor;
	float4 g_sdfShadowColor;
	float4 g_internal;
}

cbuffer ThresholdConstants : register(b1)
{
	float g_threshold;
}

float4 PS(s3d::PSInput input) : SV_TARGET
{
	float4 texColor = g_texture0.Sample(g_sampler0, input.uv);

	// グレースケール値を計算
	float gray = dot(texColor.rgb, float3(0.299, 0.587, 0.114));

	// 閾値より小さければ黒、大きければ白
	texColor.rgb = (gray < g_threshold) ? float3(0.0, 0.0, 0.0) : float3(1.0, 1.0, 1.0);

	return (texColor * input.color) + g_colorAdd;
}
GLSL
# version 410

//
//	Textures
//
uniform sampler2D Texture0;

//
//	PSInput
//
layout(location = 0) in vec4 Color;
layout(location = 1) in vec2 UV;

//
//	PSOutput
//
layout(location = 0) out vec4 FragColor;

//
//	Constant Buffer
//
layout(std140) uniform PSConstants2D
{
	vec4 g_colorAdd;
	vec4 g_sdfParam;
	vec4 g_sdfOutlineColor;
	vec4 g_sdfShadowColor;
	vec4 g_internal;
};

layout(std140) uniform ThresholdConstants
{
	float g_threshold;
};

//
//	Functions
//
void main()
{
	vec4 texColor = texture(Texture0, UV);

	float gray = dot(texColor.rgb, vec3(0.299, 0.587, 0.114));

	texColor.rgb = (gray < g_threshold) ? vec3(0.0, 0.0, 0.0) : vec3(1.0, 1.0, 1.0);

	FragColor = (texColor * Color) + g_colorAdd;
}
HLSL, GLSL, いずれのピクセルシェーダでも、テクスチャから読み込んだ色をグレースケール値(0.0~1.0)に変換し、それが定数バッファ ThresholdConstants の値 g_threshold より小さければ黒、それ以外の場合は白を出力色とします。
# include <Siv3D.hpp>

// 定数バッファ (PS_1)
struct ThresholdConstants
{
	// 閾値
	float threshold;
};

void Main()
{
	const Texture windmill{ U"example/windmill.png" };
	const PixelShader ps = HLSL{ U"example/shader/hlsl/threshold.hlsl", U"PS" }
		| GLSL{ U"example/shader/glsl/threshold.frag", {{U"PSConstants2D", 0}, {U"ThresholdConstants", 1}} };

	if (not ps)
	{
		throw Error{ U"Failed to load a shader file" };
	}

	// 定数バッファ
	ConstantBuffer<ThresholdConstants> cb;

	while (System::Update())
	{
		cb->threshold = (Cursor::Pos().x / 800.0f);

		{
			// ピクセルシェーダの定数バッファスロット 1 に cb をセット
			Graphics2D::SetPSConstantBuffer(1, cb);

			// 二値化シェーダを適用
			const ScopedCustomShader2D shader{ ps };
			windmill.draw(10, 10);
		}
	}
}
C++ プログラム側では、定数バッファと同じ構造の構造体を用意し、ConstantBuffer<T> でラップしたのち、適宜値をセットして Graphics2D:SetPSConstantBuffer() を使って、定数バッファを設定します。
今回のコードでは、マウスカーソルの X 座標が右にあればあるほど閾値が大きくなります。